
Solar Sprint (LFEC Stream Academy)
Event Location: Cocoa-FL
Competition: Junior Solar Sprint
Division: 4-6 (JSS Green)
School: Learning Forward Education Center
Team Name: Solstice Speedsters
Project Name: Solar Sprint
Team Size: 4
Solstice Speedsters
Team Members
Zac B. 4th Grade
Athen G. 6th Grade
Declan M. 5th Grade
Jameson M. 6th Grade
DESIGN PROCESS (FINAL DESIGN): DEVELOPMENT
3D MODELING
First, we researched the most effective models for reduced drag and a more aerodynamic model than our first model. We also looked up low friction bearings to help with drag.
We used 3d builder to create concept layouts. Then we voted on the design and printed to make sure we had accurate measurements. The complex design included hollowing out parts of our base frame and included wiring and good measurements.
Journal
On the first day, when our teacher introduced the idea of participating in the Solar Sprint, the four of us eagerly signed up. Initially, we had an outdated design in mind, but upon realizing its high friction levels, we sought out a new design. After some searching, we discovered a three-wheeled car design that minimizes friction, providing us with an optimal solution for our project.
3/19/2024
We got this super cool 3D printer? And we were all psyched up to put it together. First, we assembled the frame and fastened it securely onto the base. Then, we carefully installed the nozzle and the filament guide. After that, we meticulously tightened all the bolts and made sure everything was snug. Excited to see it in action, we loaded a test filament. But, uh-oh, it just wouldn’t feed properly into the printer! After a few attempts, we decided to halt our efforts and troubleshoot the issue.
3/21/2024
Things that happened over spring break is I when to school and look over the 3D printer, but I couldn’t find what was wrong, so then I sat and started reading the intrusion
Okay, so, we were messing around with the printer, right? And guess what? We found this lever that lets you feed the filament into the printer. So, I checked that off the to-do list and started hunting for more issues. The first snag was that there weren’t any instructions on the app for using the 3D printer. So, I went on a massive search spree and thought I’d finally discovered a solution.
4/1/2024
Then we had some difficulty with 3D printing but we fixed it.
We started to print, and it printed a piece, and we need to print more pieces, so we printed 1 more piece today.
4/2/2024
We started sanding down the 3d print and found are place for the wheel and the axle! Now we just need to find a place for the third wheel, which shouldn’t be too hard hopefully
4/3/2023
A new problem showed up, the gear for the axle is really hard to get on and were still sanding the 3d car Athen go the idea to hammer in the gear so that fixed are gear problem while Declan tried are other design. Declan drilled the hole that we needed for the second design. We also put on a suction cup.
| Name: | Grade, Age | What each team member does: |
| Declan.M | 5th grade 11 | Declan help doing the journal and other writing and sanding the car. |
| Jameson.M | 6TH, 12 | Jameson connects all the parts with hot glue and also thinks of some of the ideas and helps build the car. |
| Athen.G | 6th, 11 | Athen helps by finding materials and 3d printing parts for the car and owner car design |
| Zack.A | 6TH, 12 | Zack helps by doing the computer work website and also give advice to help build the car. |
Finished Car Specifications
Car Size: 27cm long, 8.89cm wide, 12.7cm high
Weight: 10 ounces
Wheel Sizes: 40mm
Materials
- Motor
- Sichuan Cup
- Wood
- Tape
- Wheels
- Hot Glue
- Filament
- Sand Paper
- 3-D Printer
- Drill
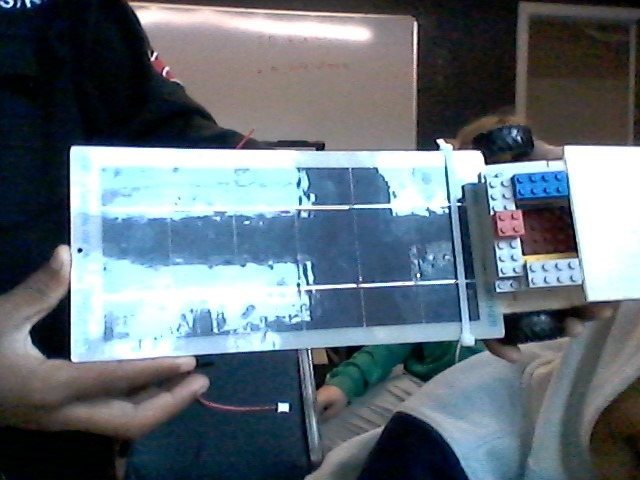
Car first design using Legos to hold the ball and an angled solar panel.
Good job testing, finding out what could be done better, and redesigning.
It is impressive that you built two cars. The second car looks really lightweight. How fast does it go?